Building a personal computer (PC) might sound tough, but it’s easier than you think. With the right guide and a bit of patience, anyone can do it. This PC assembly guide will walk you through the whole process, making sure you end up with a custom personal computer that suits your needs. Whether you’re new to this or need a refresher, we’ve got everything covered from picking parts to putting it all together.
Introduction
Building your own personal computer is like putting together a big puzzle. Each piece has a place, and when everything fits, it works smoothly. This guide will help you understand each step clearly. From picking the right parts to starting it up for the first time, we’ll cover it all. Let’s get started!
Choosing Your Components
Before you start building, you need to pick the right parts. Each part has a role in how your PC performs.
Processor (CPU)
The CPU is the brain of your PC. Pick one that fits your needs, whether for gaming, work, or general use. Intel and AMD have great options.
Motherboard
Your motherboard should match your CPU and other parts. Check for the right number of USB ports, RAM slots, and extra slots for future upgrades.
Memory (RAM)
RAM helps your PC run smoothly. Start with at least 16GB. If you do heavy tasks like video editing or gaming, you might need more.
Storage
Choose between a hard drive (HDD) for lots of space or a solid-state drive (SSD) for speed. Many people use both for the best of both worlds.
Graphics Card (GPU)
For gaming or graphic work, you’ll need a good GPU. Check out the latest from NVIDIA or AMD.
Power Supply Unit (PSU)
Your PSU needs to power all your parts. A modular PSU helps keep your build tidy.
Case
Pick a case that fits all your parts and has good airflow to keep everything cool.
Tools You Will Need
Before you start, gather these tools:
- Screwdrivers
- Anti-static wrist strap
- Thermal paste (if needed)
- Zip ties for cable management
Preparing Your Workspace
Make sure you have a clean, well-lit space. Static electricity can damage parts, so work on a non-conductive surface and use an anti-static wrist strap.
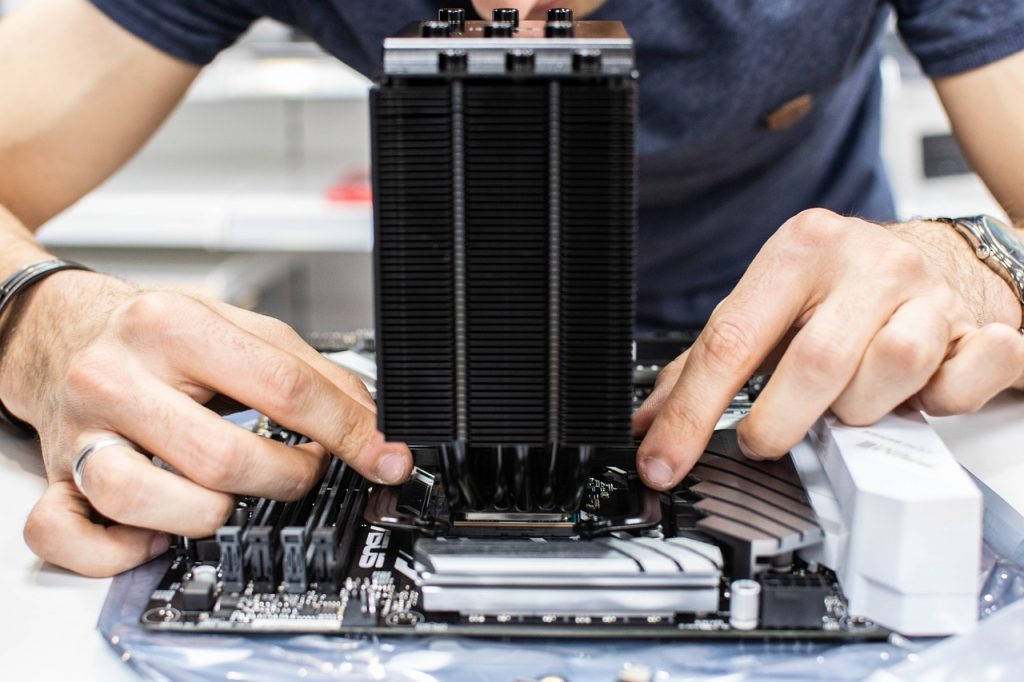
Installing the CPU
- Open the CPU socket on the motherboard.
- Align the CPU with the socket using the marked corners.
- Place the CPU into the socket and secure it with the retention arm.
- Apply thermal paste if needed.
- Attach the CPU cooler and connect it to the motherboard.
Installing the RAM
- Find the RAM slots on the motherboard.
- Open the clips on each slot.
- Align the RAM module with the slot and press down until it clicks.
Installing the Motherboard
- Place the motherboard in the case and align it with the standoff screws.
- Secure the motherboard with screws.
Installing the Power Supply
- Mount the PSU in its spot in the case.
- Secure it with screws.
- Connect the main power cables to the motherboard and other parts.
Installing Storage Drives
- Mount your HDD or SSD in the drive bays.
- Connect the SATA cables to the motherboard and power supply.
Installing the Graphics Card
- Find the PCIe slot on the motherboard.
- Remove the slot cover from the case.
- Insert the GPU into the PCIe slot and secure it.
Connecting the Cables
- Connect all power cables from the PSU to the motherboard, GPU, and drives.
- Connect the front panel connectors (power switch, USB ports, etc.) to the motherboard.
- Organize the cables using zip ties.
First Boot and BIOS Setup
- Connect your monitor and peripherals.
- Turn on your PC and enter the BIOS setup (press F2 or DEL during boot).
- Check that all parts are recognized and adjust settings if needed.
Installing the Operating System
- Insert your OS installation media (USB or DVD).
- Follow the instructions to install the OS.
- Partition your drives if needed.
Installing Drivers and Updates
- Install drivers for the motherboard and GPU from their websites.
- Run Windows Update (or your OS equivalent) to keep your system updated.
Final Tips and Troubleshooting
- Double-check all connections if the PC doesn’t start.
- Make sure all parts are seated properly.
- Look up online forums for help with specific issues.
Conclusion
Building your own PC is a great experience. You learn a lot, and it feels good to use a computer you put together yourself. Follow this guide, take your time, and soon you’ll have a custom-built PC that’s perfect for you.
FAQs
1. What tools do I need to build a PC?
You’ll need screwdrivers, an anti-static wrist strap, thermal paste (if not pre-applied), and zip ties.
2. How long does it take to build a PC?
For a beginner, it can take 3 to 5 hours. Experienced builders might finish in 1 to 2 hours.
3. Can I build a personal computer (PC) without a graphics card?
Yes, if your CPU has integrated graphics. But for gaming or graphic work, you’ll need a GPU.
4. Do I need an anti-static wrist strap?
It’s recommended to avoid damaging parts with static electricity. If you don’t have one, touch a metal part of your case often.
5. What should I do if my PC doesn't boot?
Check all connections, make sure parts are properly seated, and consult your motherboard’s manual for troubleshooting tips.